I’m a novice at tying spey flies, but I’m intrigued by the final product and it’s an opportunity to learn new fly tying techniques. I’ve written a couple of posts about my experience (Another Spey Fly – Done and Tying Spey Flies – I’m Scared!) and I’ve learned a few “rules” that hopefully help in the next one I tie at the vise. With that background, I thought I’d provide a few spey fly lessons learned as I begin my next project – a Green Butt Skunk Spey.
To provide a little perspective, I just finished tying 7 dozen #16 Sparkle Dun PMD flies.

I’m so used to quickly tying trout flies. I had to switch my brain a little as I placed a size 1.5 steelhead iron in my vise!
But truthfully, the most difficult thing about tying spey flies? Sitting down at the vise.
I tied the Green Butt Skunk Spey so many times in my head. I was thinking about proportions, placement of materials, and married wings. It was overwhelming.
So I finally sat down at the vise and began. The flat silver tinsel tag and red-dyed golden pheasant crest tail went fairly quick as I had tied a few flies using those materials in the past.
Next I attached a medium oval tinsel rib and small oval tinsel as a counter-rib. Where should I attach them to the hook? Top and bottom? One on each side?
I decided to tie the medium oval tinsel on the hook opposite me because I didn’t want the first turn to disturb the tail. The second tinsel is counter-wrapped so I tied it on the side closest to me.
Next came the butt. I attached it to the hook and moved the thread to the tie-off point after using my scissors to measure proportions I was trying to achieve (1/3 butt vs. 2/3 body). I was trying to get the second turn of tinsel on top of the hook at the dividing point of the chartreuse butt and black dubbed body.
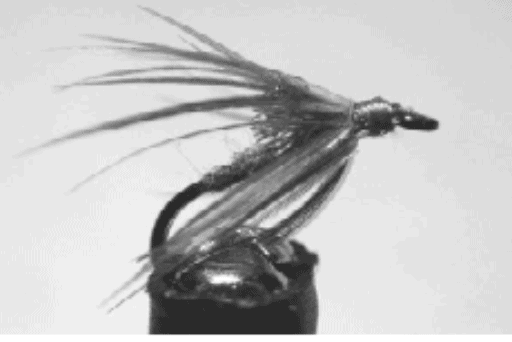
The fly pattern calls for black-dyed blue-eared pheasant feathers. Well, I don’t have any of those, so I settled for the alternate of black marabou. I stripped off the fibers from one side of the feather so not to over-dress the fly. I tied it in on the opposite side of the hook. Then came the black dubbed body.
I tried to visualize how much room to leave for an extra turn of black marabou and a couple of wraps of teal feather. Lastly, the wing needs some room as well.
I left the thread a short distance from the hook eye after finishing a dubbed body, hoping my proportions were correct.
I wrapped the tinsel forward trying to evenly space them with the second wrap at the juncture of butt and body, third wrap at center of the hook and tied it off with only a couple of thread wraps. It was a little difficult trying to not catch any marabou fibers as I wrapped the tinsel forward.
The marabou feather came next. I found I had tied it in too far away on the opposite side of the hook as I wanted the stem immediately next to the trailing edge of tinsel. Lesson learned – the next fly will be better.
The final counter-wrap of silver tinsel was next. It serves to provide strength for the feather from the fish’s tooth. A bodkin came in handy to move marabou fibers out of the way as the tinsel was wrapped forward.
The teal feather I chose was large enough to match the size of marabou I used. However, during the wraps I noticed the stem was a little larger in diameter than what I would like. I think it affected the size of the final tie-in point for the final married wings. I’ll keep that in mind when the next fly is tied.
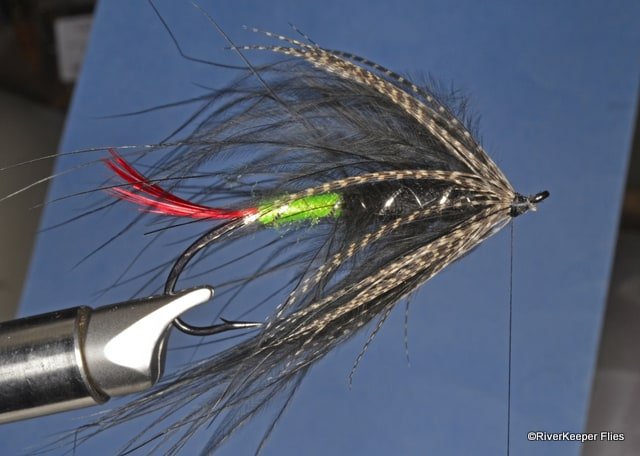
Speaking of wing, that came next. It is comprised of fibers from two goose shoulders – a white and red feather.
I’ve never used goose shoulder feathers before. I reviewed instructions from John Shewey’s Steelhead Flies book and clipped them as follows:

I wasn’t sure how many fibers of each color to use, so I just guessed. I might try a tad bit wider wing on the next fly.
Here I’ve married the red fibers between the white ones after cutting them off the stem.

The fly ready to apply the married wings.
The married wings are held with a few thread wraps.
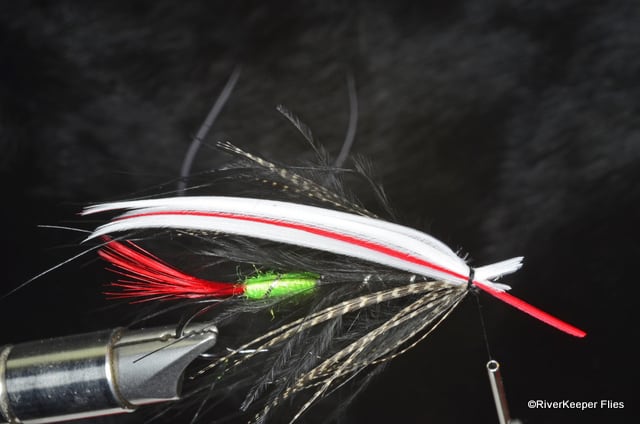
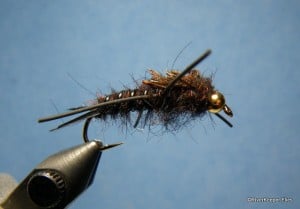
Lastly, a picture of the completed fly.

On the next fly, I’ll try to set the wing a little closer to the body.
I think tying Sparkle Dun mayflies are MUCH easier!
My goal is to tie an adequate Green Butt Skunk Spey fly that can be one of those mounted on the Expo Spey Plate.
Enjoy…go fish!


Beautiful. Let me know when you’re ready to tackle the Green Highlander.
Dennis
Karen and I were just talking about you and the Green Highlander! I think it will be awhile.
John
Hi John,
Your Spey flies are better than mine. Good job! Take care & …
Tight Lines – Al Beatty
Thanks Al!